
Tips and Tricks for Baking Bread
Fresh bread is one of my favorite things. Store bought will never taste as good. Going to a bakery is fine, the bread there is always amazing. However, making my own is so satisfying. When the smell of baking bread fills my house it feels so homey! Then, when I get to take it out of the oven and eat it, I feel so accomplished. And nothing puts a smile on my families face like seeing that Mom baked a loaf of fresh bread.
This includes affiliate links. That means that if you purchase through these links that Califf Creations will receive compensation that is of no extra cost to you. This helps cover the costs of Califf Creations.
I first decided to make my own bread last year around St. Patrick’s Day. Whenever I cook my Guinness Glazed Corned Beef, I have a lot of leftovers. We usually eat these leftovers in the form of sandwiches on rye bread. So, I decided to try and make my own rye.
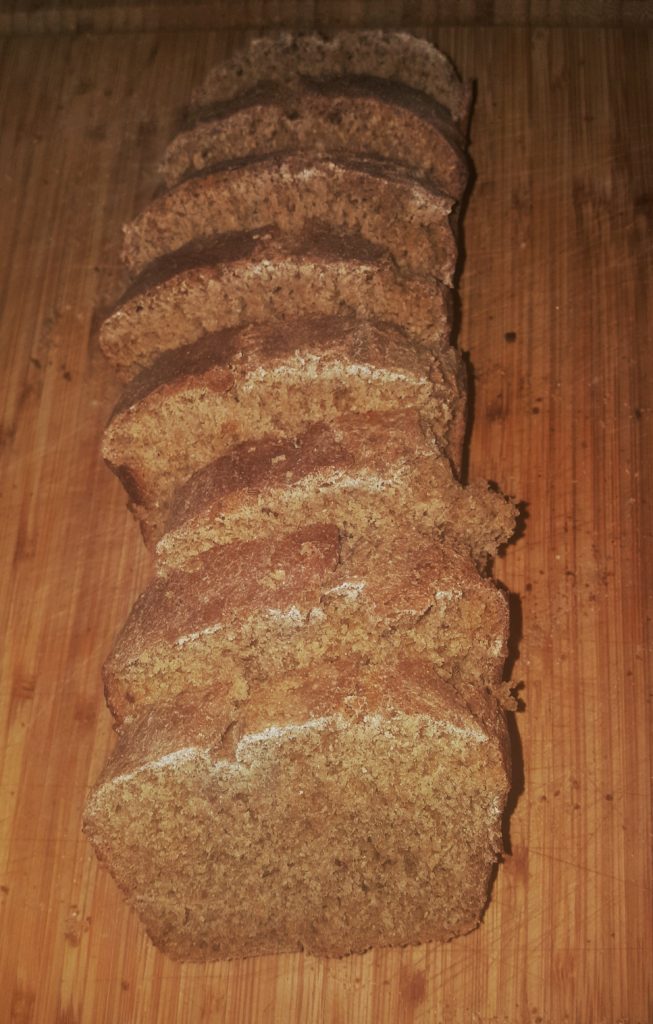
It came out tasting good, but it was a PAIN! I simply didn’t know what I was doing. Kneading the dough was difficult on my hands and I ended up working too much flour into it. I also had a really hard time getting the bread to rise. It took nearly four hours for the dough to double! I spent nearly all day trying to get the dough to the point where I could even start to bake. This was incredibly frustrating and I didn’t really know what I had done wrong.
Learning from my Mistakes
I tried again this year making the same rye bread after reading what felt like a million recipes and suggestions. I used these to learn from my mistakes as I took on this venture again.
First, I used my new KitchenAid stand mixer. This was amazing! I didn’t have to knead the dough by hand because it came with a special hook for kneading bread. Using that alone helped save me a lot of time. It makes mixing and kneading the dough so much easier. Plus, they come in so many different colors that look great.

The other thing I adjusted was how I treated my yeast. Yeast is incredibly sensitive and must be kept warm in order to activate properly. This is how the bread dough rises. The first time I made bread, I had made sure to use the correct temperature water to dissolve the yeast the first time (between 110-115 degrees). However, I didn’t warm my mixing bowl, so the yeast may have been shocked when I put it into the bowl.
My new stand mixer came with a metal bowl. This is really easy to warm by simply turning the light on in my oven with the bowl inside. There was enough heat produced to warm the bowl just enough to protect the yeast.
I used this same method to warm the glass bowl that I used to rise the bread. After kneading the dough in my Kitchenaid, I greased the glass bowl (which was now warm) and put my dough into the bowl, turning it once to cover the top. Then, I covered the dough with a warm, damp rag (again warm is key) and put the bowl back in the oven to rise, leaving the light on still.
The oven is the perfect place to rise bread. It is free of drafts and leaving the light on provides just enough heat to protect the yeast. Doing it this way, my dough doubled in size in 1.5-2 hours. I was so happy!
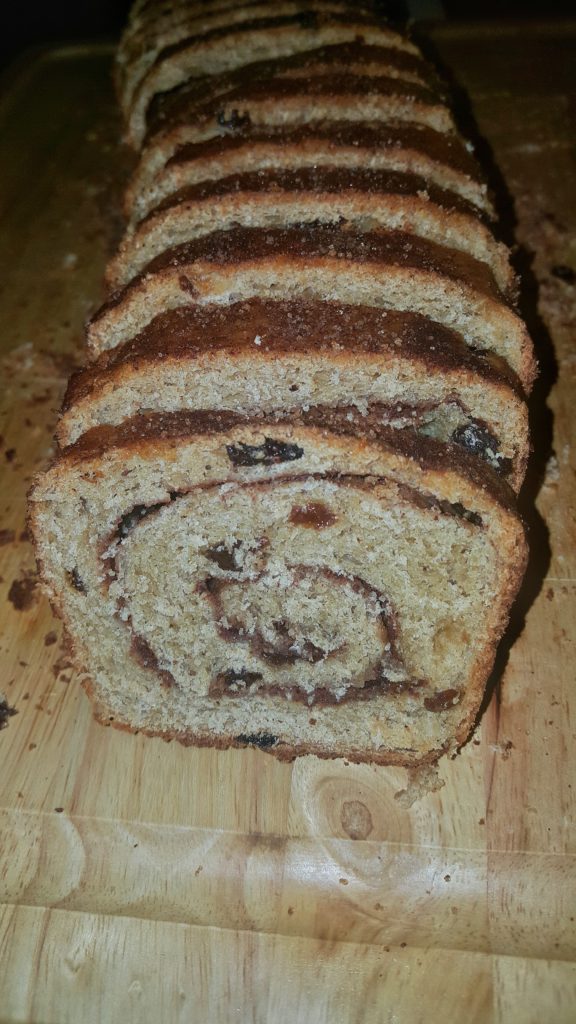
I learned a lot from my mistakes the first time around. With my Kitchenaid mixer and my new techniques to protect the yeast, I have now gone on to try more types of bread. My favorite, so far, has been Cinnamon Raisin Bread. What’s your favorite kind of bread?
Do you have any other tips and tricks that you can teach me? I still consider myself new at this and I’m always looking to learn more!
This delicious bread is great for breakfast, a snack, or even as a dessert. Cinnamon, sugar, and raisins all together in a yummy bread.
Warm the milk until it just starts bubbling, stirring occasionally. Remove from heat and let cook until lukewarm.
Dissolve yeast in warm water and set aside for about 10 minutes or until frothy.
Mix in eggs (1 full egg, 1 only the whites), 1/4 cup sugar, softened butter, salt and raisins. Then, stir in cooled milk slowly, you don't want the eggs to cook.
Mix in flour 1/2 cup at a time until dough is stiff. Knead dough on lightly floured surace until smooth.
Place in a large, buttered mixing bowl and turn to grease surface of the dough. Make sure the bowl isn't cold so you don't shock the yeast.
Cover with a warm, damp cloth and allow to rise until doubled, about 1 1/2-2 hours. You need a warm place free of drafts. I use my oven with the light on and this tends to work well.
On a lightly floured surface, roll dough into a large rectangle so dough is about 1/2 in thick.
Moisten dough with 1 tbsp milk and rub all over the dough.
Mix 1/2 cup sugar with ground cinnamon and sprinkle mixture evenly on moistened dough, save a small amount for later. Then, roll up tightly, the long way.
Place in well greased pan. If you don't have pan long enough, cut loaf in half to fit into smaller bread pans. Lightly grease the tops of the loafs, and allow to rise, uncovered in a warm place for about another hour.
Sprinkle remainder of cinnamon sugar mixture onto the top of the loaf. Bake at 350 degrees for 45 minutes or until loaf is lightly browned.
Remove from oven and allow to cool on a wire rack. Spread melted butter over the top of the loaf.
Allow to cool completely before slicing. Serve and Enjoy!

Ingredients
Directions
Warm the milk until it just starts bubbling, stirring occasionally. Remove from heat and let cook until lukewarm.
Dissolve yeast in warm water and set aside for about 10 minutes or until frothy.
Mix in eggs (1 full egg, 1 only the whites), 1/4 cup sugar, softened butter, salt and raisins. Then, stir in cooled milk slowly, you don't want the eggs to cook.
Mix in flour 1/2 cup at a time until dough is stiff. Knead dough on lightly floured surace until smooth.
Place in a large, buttered mixing bowl and turn to grease surface of the dough. Make sure the bowl isn't cold so you don't shock the yeast.
Cover with a warm, damp cloth and allow to rise until doubled, about 1 1/2-2 hours. You need a warm place free of drafts. I use my oven with the light on and this tends to work well.
On a lightly floured surface, roll dough into a large rectangle so dough is about 1/2 in thick.
Moisten dough with 1 tbsp milk and rub all over the dough.
Mix 1/2 cup sugar with ground cinnamon and sprinkle mixture evenly on moistened dough, save a small amount for later. Then, roll up tightly, the long way.
Place in well greased pan. If you don't have pan long enough, cut loaf in half to fit into smaller bread pans. Lightly grease the tops of the loafs, and allow to rise, uncovered in a warm place for about another hour.
Sprinkle remainder of cinnamon sugar mixture onto the top of the loaf. Bake at 350 degrees for 45 minutes or until loaf is lightly browned.
Remove from oven and allow to cool on a wire rack. Spread melted butter over the top of the loaf.
Allow to cool completely before slicing. Serve and Enjoy!
Follow Me!
Related Posts


32 Comments
Shernette Williams
Omg this sounds amazing! I commend you for learning this all on your own and I’m sure the more you make it the better it gets. I’ve been wanting to start baking my own break, I’ll definitely keep this on hand. THANK YOU
Kat
It’s fun learning new things! And when it involves cooking, it’s fun to eat them too!
Amber
That cinnamon bread looks amazing! I was making my own bread for a long time and then my breadmaker broke. I might have to start doing so again.
Kat
I’ve never had a breadmaker since I have a tiny kitchen. I always just mixed and did it in the oven! Sounds like they make it easier, but totally not necessary.
Jenna
This bread looks delicious! I’ve only ever baked banana bread haha
Kat
Banana bread is delicious! Its fun to try others though.
Ana Jacqueline
Your cinnamon raisin bread looks so delicious! I’ve never made bread myself but I’m actually going to try your recipe.
Kat
It takes patience, but it’s worth it!
Shelley
That cinnamon raisin bread looks so good. I’d love to see banana nut on your blog.
Kat
I haven’t made it in a while since bananas are eaten so fast in my house they never get ripe enough. I’ll have to designate a couple to make some banana nut bread!
Natalie
I need to start baking bread again! This recipe sounds SOO good I know my kiddo would love this one.
Kat
Mine sure did!!!
Adrienne Bruner
I have always wanted to make my own bread! I have a kitchen aid mixer and I am embarrassed to say that I have only every used it to shred chicken. Ahh!! I know there are so many uses and I just need to do it! I am going to start with this recipe here!
Kat
It’s amazing all the things you can do with the kitchenaid!
Rebecca Andexler
I love cinnamon raisin bread and this recipe looks super approachable. Might have to give it a try this weekend. Love my kitchenaide mixer too!
Kat
It’s a really easy recipe and tastes so good!
J. Ivy
Great tips! Nothing beats a Kitchenaid Mixer, in my opinion. There are so many attachments for those mixers that make cooking so much cooler
Kat
I agree! I’m working on another post about the attachments!
Melissa | Bubby and Bean
I’m so glad you shared this because I LOVE baking bread but it’s been forever, so this inspires me to get on it! And I love any excuse to use my w KitchenAid stand mixer! This recipe looks incredible too – I’ve never made a sweet bread before.
Kat
It is really good! I hope you are inspired to get back to making some bread!
Floby
Kaaaat! Finally did it putting off my grammarly opt. Haha! I love this idea of baking, I am a bit short tempered person with measuring, but yes, I would most def try this one! Thank you for the recipe, I haven’t heard but it looks yummy!
Kat
YAY!!! The recipe is a hit in my family. Measuring can be annoying, but for baking anything it is KEY! You get the best results when you are precise. I find it to be a bit like chemistry (I’m a science nerd)!
KJ
Still working on the art of baking bread. These tips will definitely help me!
Kat
It takes a long time to learn. I learn something new every time.
Laura
SOO I cheat a little bit and use my bread maker 🙂 I LOVE it. I make bread daily, it is so easy and almost flop proof!
Kat
That’s great that you can make it everyday! I don’t have room in my kitchen for a bread maker so it’s the oven for me.
Leah
I love homemade bread! We make a few batches every week with our kitchen aid. My only tip would be is yeast likes sugar dissolve the sugar in the water then place your years in the water it will help the yeast get frothy typically a little faster. Great recipe!
Kat
Oh I like that tip! Thanks! I’ll try that next time.
Julie
My husband has made a no knead bread couple times. Making bread is definitely a learning process. I want to make a bread with my kitchen aid as well. This bread looks good.
Kat
The kitchenaid makes it so much easier!
Sarah
The temperature idea is genius! I think that is always my problem too!
Thank you for sharing. Both the tips and the yummy recipe!
Kat
I hope it helps!